Using ZXing (QR Code Scanner) in Xamarin Forms
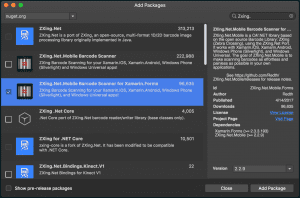
For using Zxing in Xamarin Forms we have to first add nuget to both project which are Droid and iOS.
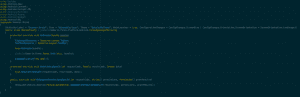
After adding nuget to our project in Droid project open MainActivity.cs and add below code to class
public override void OnRequestPermissionsResult(int requestCode, string[] permissions, Permission[] grantResults) { ZXing.Net.Mobile.Android.PermissionsHandler.OnRequestPermissionsResult(requestCode, permissions, grantResults); }After adding code your MainActivity.cs should be like that.
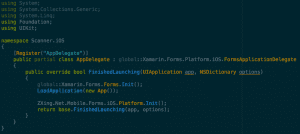
For iOS project open AppDelegate.cs and add below code to class
ZXing.Net.Mobile.Forms.iOS.Platform.Init();After adding code your AppDelegate.cs should be like that.
Now we can use ZXing in our project. There are two different ways to use ZXing. First way we can use it in screen as a part of screen or we can use it pop up page for example we can set a button to open our scanner page then when we click button the scanner screen will be opened and it will scan the QR Code or Barcode after scan then the page will closed. After that we can get result value in our page. I will show you both way to how to use.
For first way I will use ZXing in a grid the scenario is here when I click to button then the camera will be opened in grid then when I click button again the camera will be closed .
I will create a page which is name Scanner then open the Scanner.xaml and create a grid which has one row and two columns then add a button.<Grid x:Name="mainGrid"> <Grid.RowDefinitions> <RowDefinition Height="*" /> </Grid.RowDefinitions> <Grid.ColumnDefinitions> <ColumnDefinition Width="*"/> <ColumnDefinition Width="*"/> </Grid.ColumnDefinitions> <Button Grid.Row="0" Grid.Column="0" Text="Start" BackgroundColor="Green" TextColor="White" Clicked="OnClickStart" /> </Grid>After creating grid open Scanner.cs we need the create new function for button’s clicked property because we will handle it so create a OnClickStart function.
public void OnClickStart(object sender, EventArgs e){ Button button = sender as Button; if(button.Text.Equals("Start")){ button.BackgroundColor=Color.Red; button.Text = "Stop"; scanner.IsVisible = true; }else if(button.Text.Equals("Stop")){ scanner.IsVisible = false; button.BackgroundColor = Color.Green; button.Text = "Start"; } }Now we can create our scanner function actually we do not have to create a function for that we can use it in our constructor but I would like to separate codes. Also scanner variable must be global because we will change it’s visible property in OnClickStart function so create it start of the class.
public ZXing.Net.Mobile.Forms.ZXingScannerView scanner = new ZXing.Net.Mobile.Forms.ZXingScannerView(); public void Scan() { try { scanner.Options = new MobileBarcodeScanningOptions() { UseFrontCameraIfAvailable = false, //update later to come from settings PossibleFormats = new List<BarcodeFormat>(), TryHarder = true, AutoRotate = false, TryInverted = true, DelayBetweenContinuousScans = 2000 }; scanner.IsVisible = false; scanner.Options.PossibleFormats.Add(BarcodeFormat.QR_CODE); scanner.Options.PossibleFormats.Add(BarcodeFormat.DATA_MATRIX); scanner.Options.PossibleFormats.Add(BarcodeFormat.EAN_13); scanner.OnScanResult += (result) => { // Stop scanning scanner.IsAnalyzing = false; if(scanner.IsScanning) { scanner.AutoFocus(); } // Pop the page and show the result Device.BeginInvokeOnMainThread( async () => { if(result != null) { await DisplayAlert("Scan Value", result.Text, "OK"); } }); }; mainGrid.Children.Add(scanner,1, 0); } catch(Exception ex) { Console.Write(ex); } }Also we need add two functions to handle when scanner Appearing and Disappearing
protected override void OnAppearing() { base.OnAppearing(); scanner.IsScanning = true; } protected override void OnDisappearing() { scanner.IsScanning = false; base.OnDisappearing(); }After creating functions just call the function in constructor then everything is done. When you click button the scanner will start to scan when you click to stop the scanner will stop to scan.
For second way to use ZXing as a pop up page. The scenario is here there will be a button when you click the button the scanner page will be opened as pop up page then it start to scan after scanning QR Code the pop up will be closed.
First create new page which name is PopUpPage then open PopUpPage.xaml then create a new button like that.
<Button Text="Scan" BackgroundColor="Green" TextColor="White" Clicked="OnClickScan" />After then open PopUpPage.cs create new function for button which name is OnClickScan like that
public void OnClickScan(object sender, EventArgs e){ ScanAsync }Also we need to create scan function like before
public async void ScanAsync() { var scanPage = new ZXingScannerPage(); scanPage.OnScanResult += (result) => { // Stop scanning scanPage.IsScanning = false; // Pop the page and show the result Device.BeginInvokeOnMainThread(() => { Navigation.PopAsync(); DisplayAlert("Scanned Barcode", result.Text, "OK"); }); }; // Navigate to our scanner page await Navigation.PushAsync(scanPage); }Now when you click the button the pop up page will be opened and scan the QR Code or etc. I will share project in github you can download and use it if you have any problem with that please comment the below post. I will try to answer you.
Not: Do not forget to allow the camera in the project for both.
Not: to see both way in project change page name in app.cs
10 comments
Button’a basildiginda app crash oluyor. Pratik bir önerin var mı cozum icin ?
Found the problem.. info.plist allow camera for ios10.
Thanks for the discussion and demo code.
nice way you have separated out the code into methods. my current implementation is a linear mess (cut n pasted from other samples). i look forward to using your way. thanks.
Dean (inviam systems). btw we got improved scan performance by restricting the legit codes for our own purposes. ZXing.BarcodeFormat.CODE_128 , ZXing.BarcodeFormat.EAN_13
Informative tutorial, Thanks
Update in ScanAsync(),
var scanPage = new ZXingScannerPage();
await Application.Current.MainPage.Navigation.PushModalAsync(scanPage);
2nd line missed in the above explanation. Due to this, we can’t see the barcode scanning screen
Hello…. in my case, when Navigation.PushAsync(ScannerPage) is called, a page with a white square and a horizontal red line appears. What may be causing this?
Probably, you did not do the correct setting for the simulator, you need to allow your simulator to use your laptop cameras to simulate camera in the simulator, or you can try it on a real device.
hai please tell .. how we can arrage multiple QR code Button in a single page
Dear Selman
This a Great sample, It works perfect until it is updated to the latest version of xamarin
you have tried it with recent versions of xamarin?
Thanks in Advanced
Maalesef İOS projelerinde çalışmıyor.